BDS Dip. Clin Dent (Oral Implants), University of Sydney.
Clinical Director at Dental Implants on Miller, with over 25+ years experience in dental implants.

There’s something incredibly special about the day you walk out with your new All-on-4 smile. It’s a huge day for you — and it’s one you’ll likely remember for a lifetime.
Now, it’s time to ensure your new smile lasts a lifetime too.
When you have All-on-4, maintaining good oral hygiene is absolutely essential for the success and longevity of your implants.
And the good news is that keeping your new smile clean and healthy doesn’t have to be complicated. In fact, caring for your All-on-4 dental implants is much like caring for your natural teeth. With an effective All-on-4 implants cleaning routine, you’ll get the best out of your new smile for many years to come.
To help you keep your new smile in top condition, we’ve put together this handy guide on how to clean your All-on-4 implants.
Cleaning your All-on-4 implants at home is easy. While you may need to add a few new steps to your daily oral hygiene routine, they are necessary for keeping your implants and gums healthy.
Look at it this way: you’ve already invested a lot to get your new smile. So, why not invest a few extra minutes each day to ensure you’ll have it for many years ahead?
Brush your teeth at least twice a day (or after every meal) for 2 minutes with a small, soft manual toothbrush. Be sure to brush over all surfaces in your mouth and your tooth bridge to prevent plaque build-up.

Take special care when brushing along the gum line as food particles tend to get stuck around the areas where the tooth bridge is attached. Position your toothbrush in the space where your gums and tooth bridge meet, then gently slide the toothbrush along the bridge in a side-to-side motion. If your gums feel tender, don’t worry. This just means that the area needs some more time to heal — be extra gentle and continue brushing.

It may take a little time to get used to your new routine for your All-on-4 implants — but keep at it! Cleaning under your tooth bridge is crucial for clearing away food particles, preventing plaque and avoiding gum inflammation, which may lead to implant failure.
If you have enough space between your tooth bridge and gums, interdental brushes like Piksters can be used. But remember to be extra careful when using Piksters as they have a pointed tip. You also need to make sure you’re using the correct size as recommended by your oral hygiene therapist.

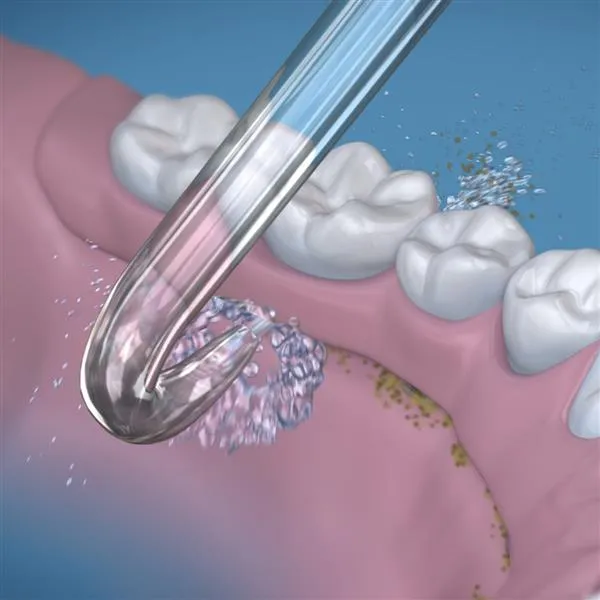
Next, use a Waterpik or water flosser to help dislodge any food particles that may be stuck in hard to reach places between the tooth bridge and gums.
Keep in mind that plaque must be removed first by brushing and interdental cleaning before using the water flosser.
Use a rubber tip gum stimulator to gently trace around where your gumline meets your tooth bridge. This is another useful step to dislodge any food particles that may have become stuck in the gums. Plus, it helps to stimulate blood flow to the area which can aid the healing process.
This last step is optional — but many people enjoy the fresh feeling of using mouthwash as the final part of their All-on-4 implants cleaning routine.
If you have existing natural teeth, you can use a fluoride-based mouthwash. Otherwise, you can opt for one with antiseptic chlorhexidine added to it like Curasept or Savacol. It’s important to note that any mouthwash with chlorhexidine can stain if used daily — so only use this 1-2 times a week.
For a more natural home remedy, you can create your own saltwater mouthwash by mixing ½ teaspoon of salt with 1 cup of warm water. Swish the solution around your mouth for 10 seconds then spit it out. You can use your saltwater mouthwash 1-2 times a week.
After your All-on-4 treatment, you will need to attend regular check-ups with your dentist every 6 months for professional cleaning and maintenance.

During these appointments, your dentist will check the condition and placement of your All-on-4 tooth bridge and implants. Your tooth bridge may be taken out so your dentist can clean your implants and remove any plaque or tartar deposits. Your dentist will also assess the overall health of your mouth and gums and may take x-rays to get the full picture of your oral health.

It is crucial that you follow through with proper All-on-4 aftercare at home. If you do not clean your All-on-4 dental implants correctly, harmful bacteria can multiply on the surface of the implant.
This may lead to infections in your jaw or gums and gum inflammation. If left untreated, this may cause bone loss around the implants and lead to pre-implantitis or implant failure. In severe cases, the implants may need to be completely removed.
If you are struggling to clean your All-on-4 implants or are having trouble with food getting stuck under your tooth bridge, it might pay to get it looked at by a professional. If a tooth bridge is not properly designed, it can become what we call a ‘food trap’ — and in this instance, a new tooth bridge may be required.
This is why we spend a significant amount of time carefully designing every tooth bridge at Dental Implants on Miller. We always ensure our tooth bridges are made with a slightly convex shape where it meets the gum line to avoid issues associated with food particles getting stuck.

While we’ve got lots of great articles on what to expect from your All-on-4 treatment, how much All-on-4 costs and the factors that may affect its price, sometimes it’s just better to talk to a human, right?
That’s why we offer a free consultation with Dr Daniel Adamo — so you can have a 100% obligation-free chat about All-on-4 and whether it’s right for you.
All-on-4 implants are fixed to the jaw (unlike dentures) and do not come out, so they function similarly to natural teeth when eating and speaking. However, the sensation differs as implants lack the periodontal ligament found in natural teeth. Your dental professional can discuss what to expect based on your individual clinical situation.
Yes, All-on-4 implants can develop peri-implantitis, a bacterial infection of the tissue surrounding the implant, if oral hygiene is inadequate. Daily brushing, interdental cleaning, and water flossing are important for minimising the risk of harmful bacteria accumulating around implant fixtures and contributing to bone loss.
A soft-bristle manual toothbrush is recommended over an electric toothbrush for All-on-4 implants. It provides better control around the bridge-gum junction. Consult our dental team before switching, as suitability depends on your specific bridge design and peri-implant tissue condition.
No. All-on-4 implants are specifically designed to avoid bone grafting in many cases by strategically angling the posterior implants to utilise available bone. However, individual suitability for All-on-4 without bone grafting depends on bone density and jaw structure. At Dental Implants on Miller, we provide a free consultation, with 3D imaging, to help determine your suitability for All-on-4.
Yes, eating with All-on-4 implants functions similarly to natural teeth once fully healed. We do recommend that you clean beneath the bridge after meals, as food particles commonly become trapped between the bridge and gum tissue.